How to Connect Your Braintree Account
After you register for a Churnkey account, you can connect it to your Braintree account(s) on our Settings | Billing Provider page. You can enter both production and sandbox credentials. The sandbox credentials are optional, but great to add if you want to test your Cancel Flow in a staging environment before going live with Churnkey.
Step 1. Braintree User with sufficient permissions
Braintree API credentials belong to a specific user, and each user has a role. You can view all users associated with your Braintree account on the Team page of the Braintree web app.
The API key that you associate with Churnkey must have sufficient user and role permissions.
Option A: Use an Account Admin
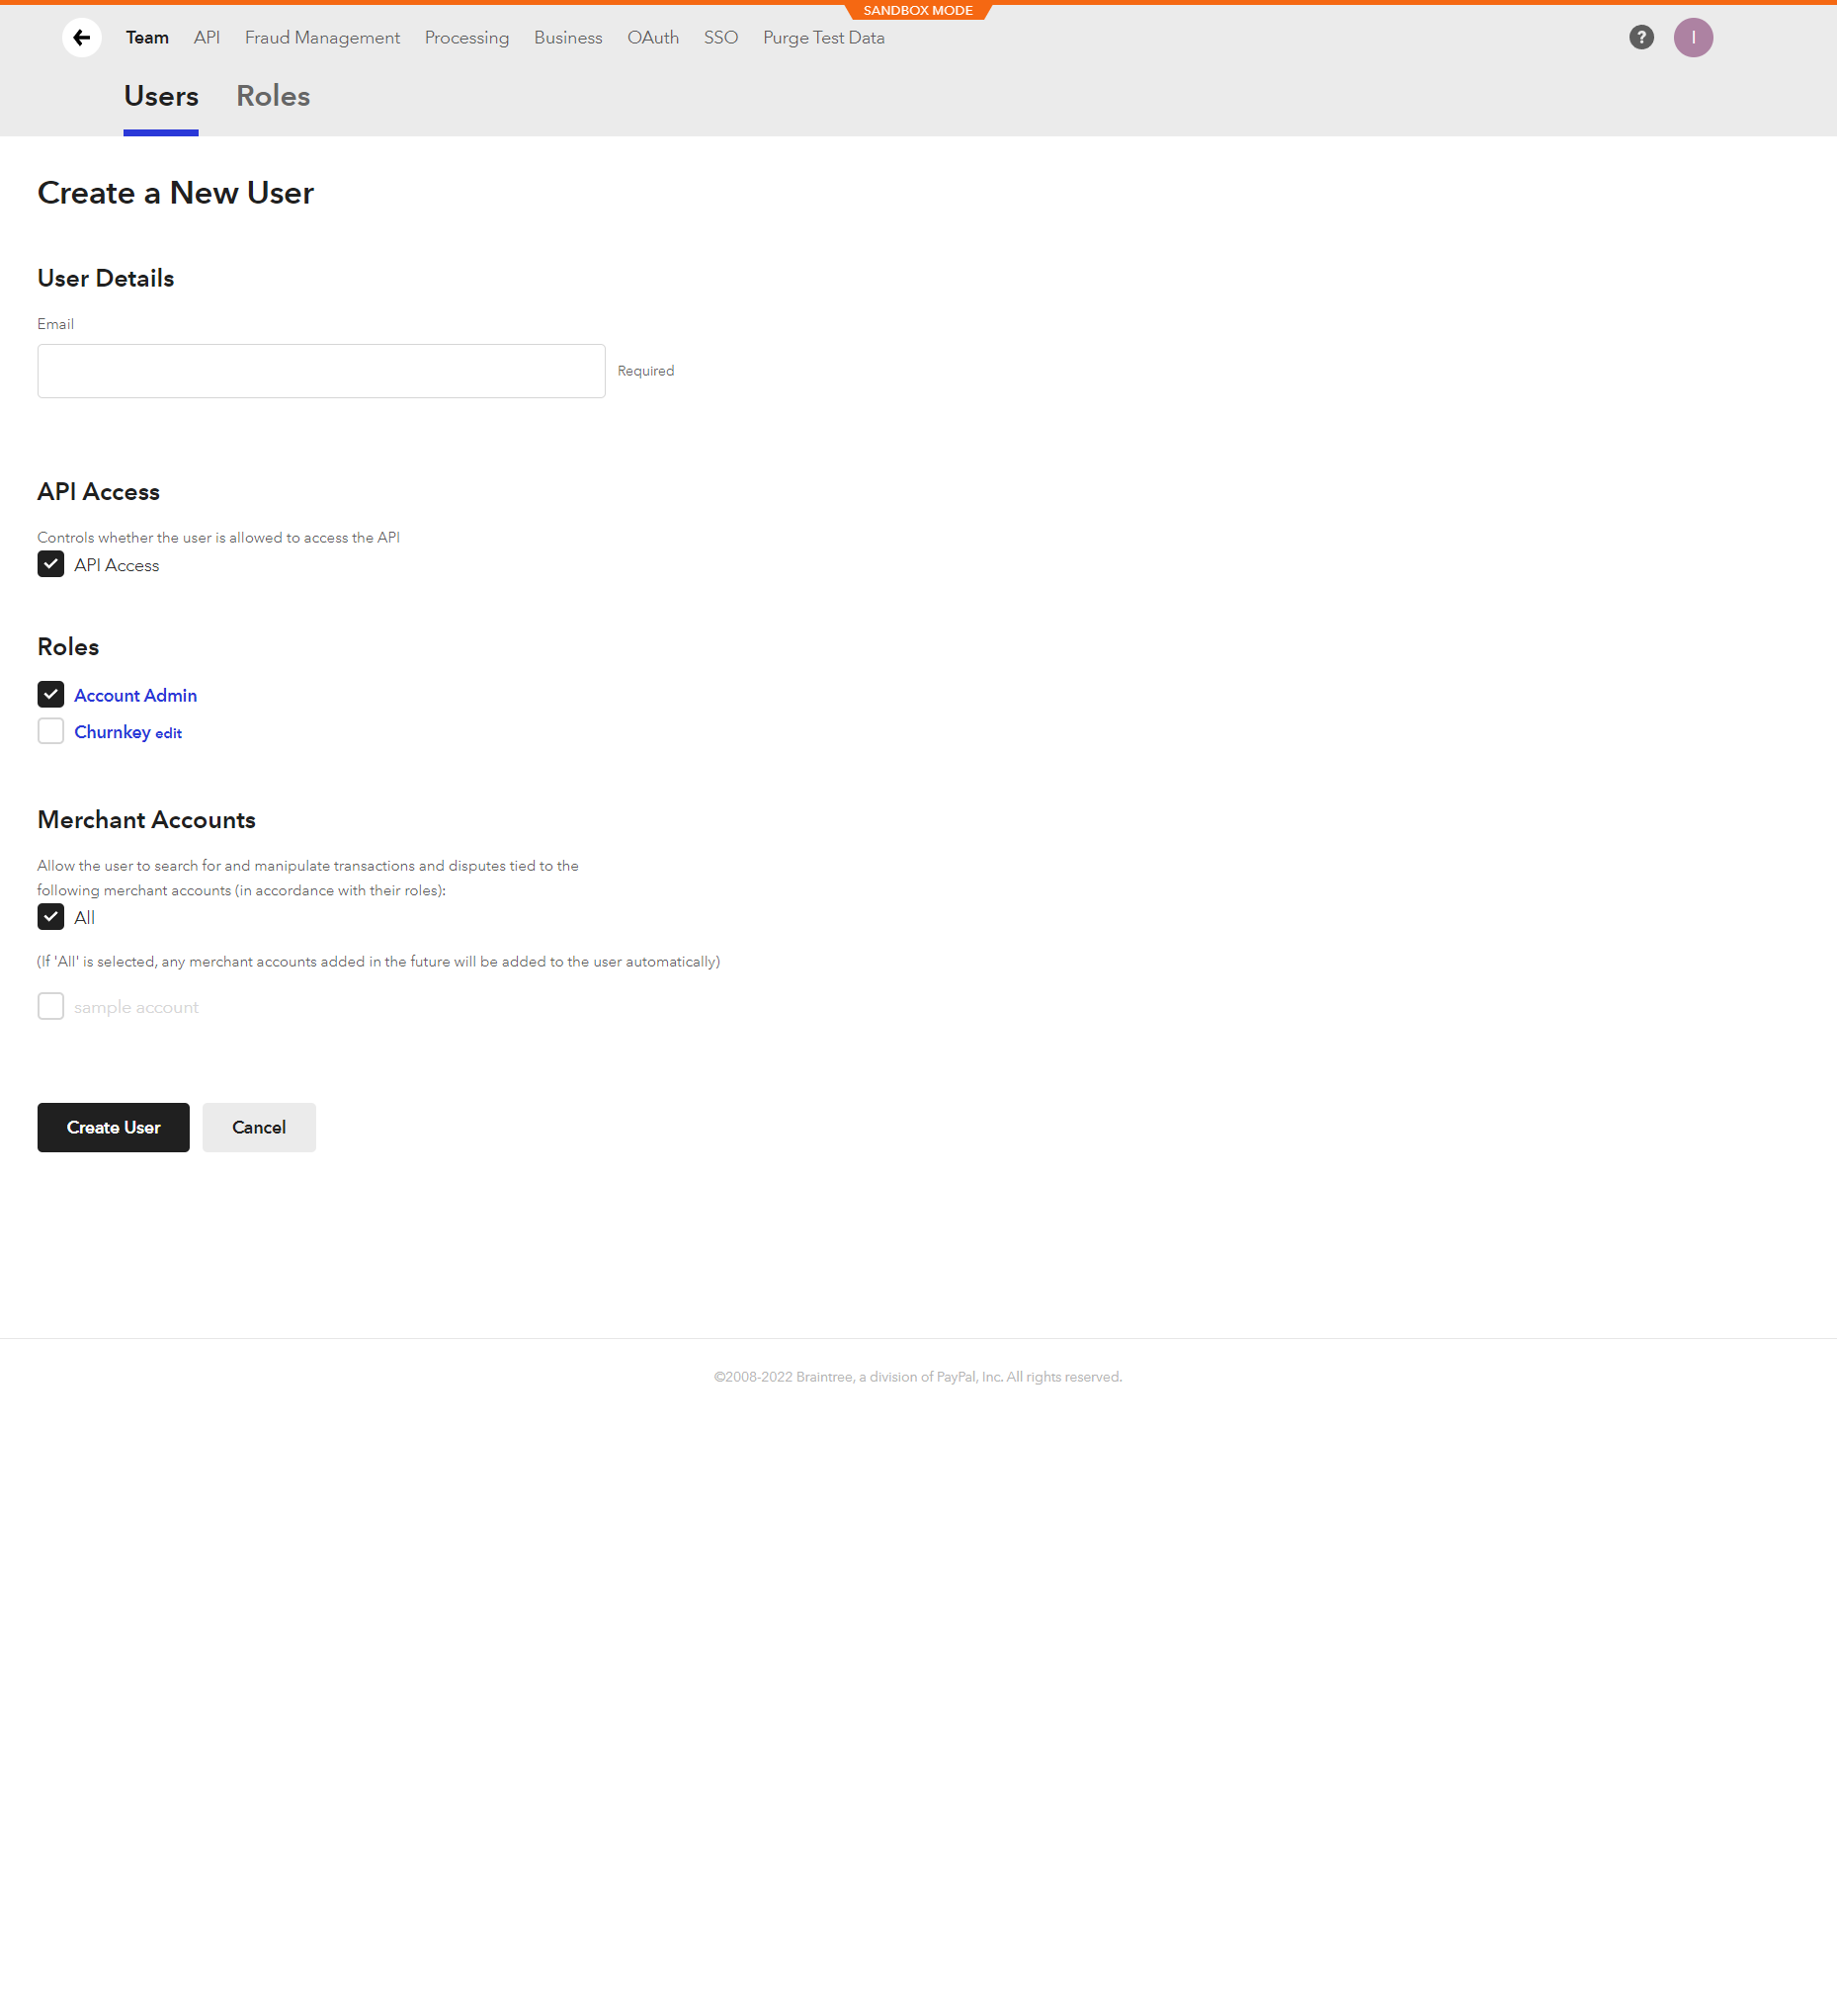
Ensure that you are logged in with a user which has Account Admin and API Access permissions, as pictured below
Account Admin user example (you can use an existing user, or create a new one for this purpose)
Option B: Create a new User and Role for Churnkey
If you would rather create a new role and associated user, we've listed the required permissions below:
Step 2. Generate an API Key
- Head to the API settings - click the gear icon in the top right → API.
- Click "+ Generate New API Key"
- Click "View" on the newly generated API key to reveal the private key
Step 3. Add Webhook Notifications
In order for Churnkey to track reactivation rates (after pauses and discounts), and keep track of total boosted revenue from your Cancel Flow, you need to add a webhook in your Braintree account.
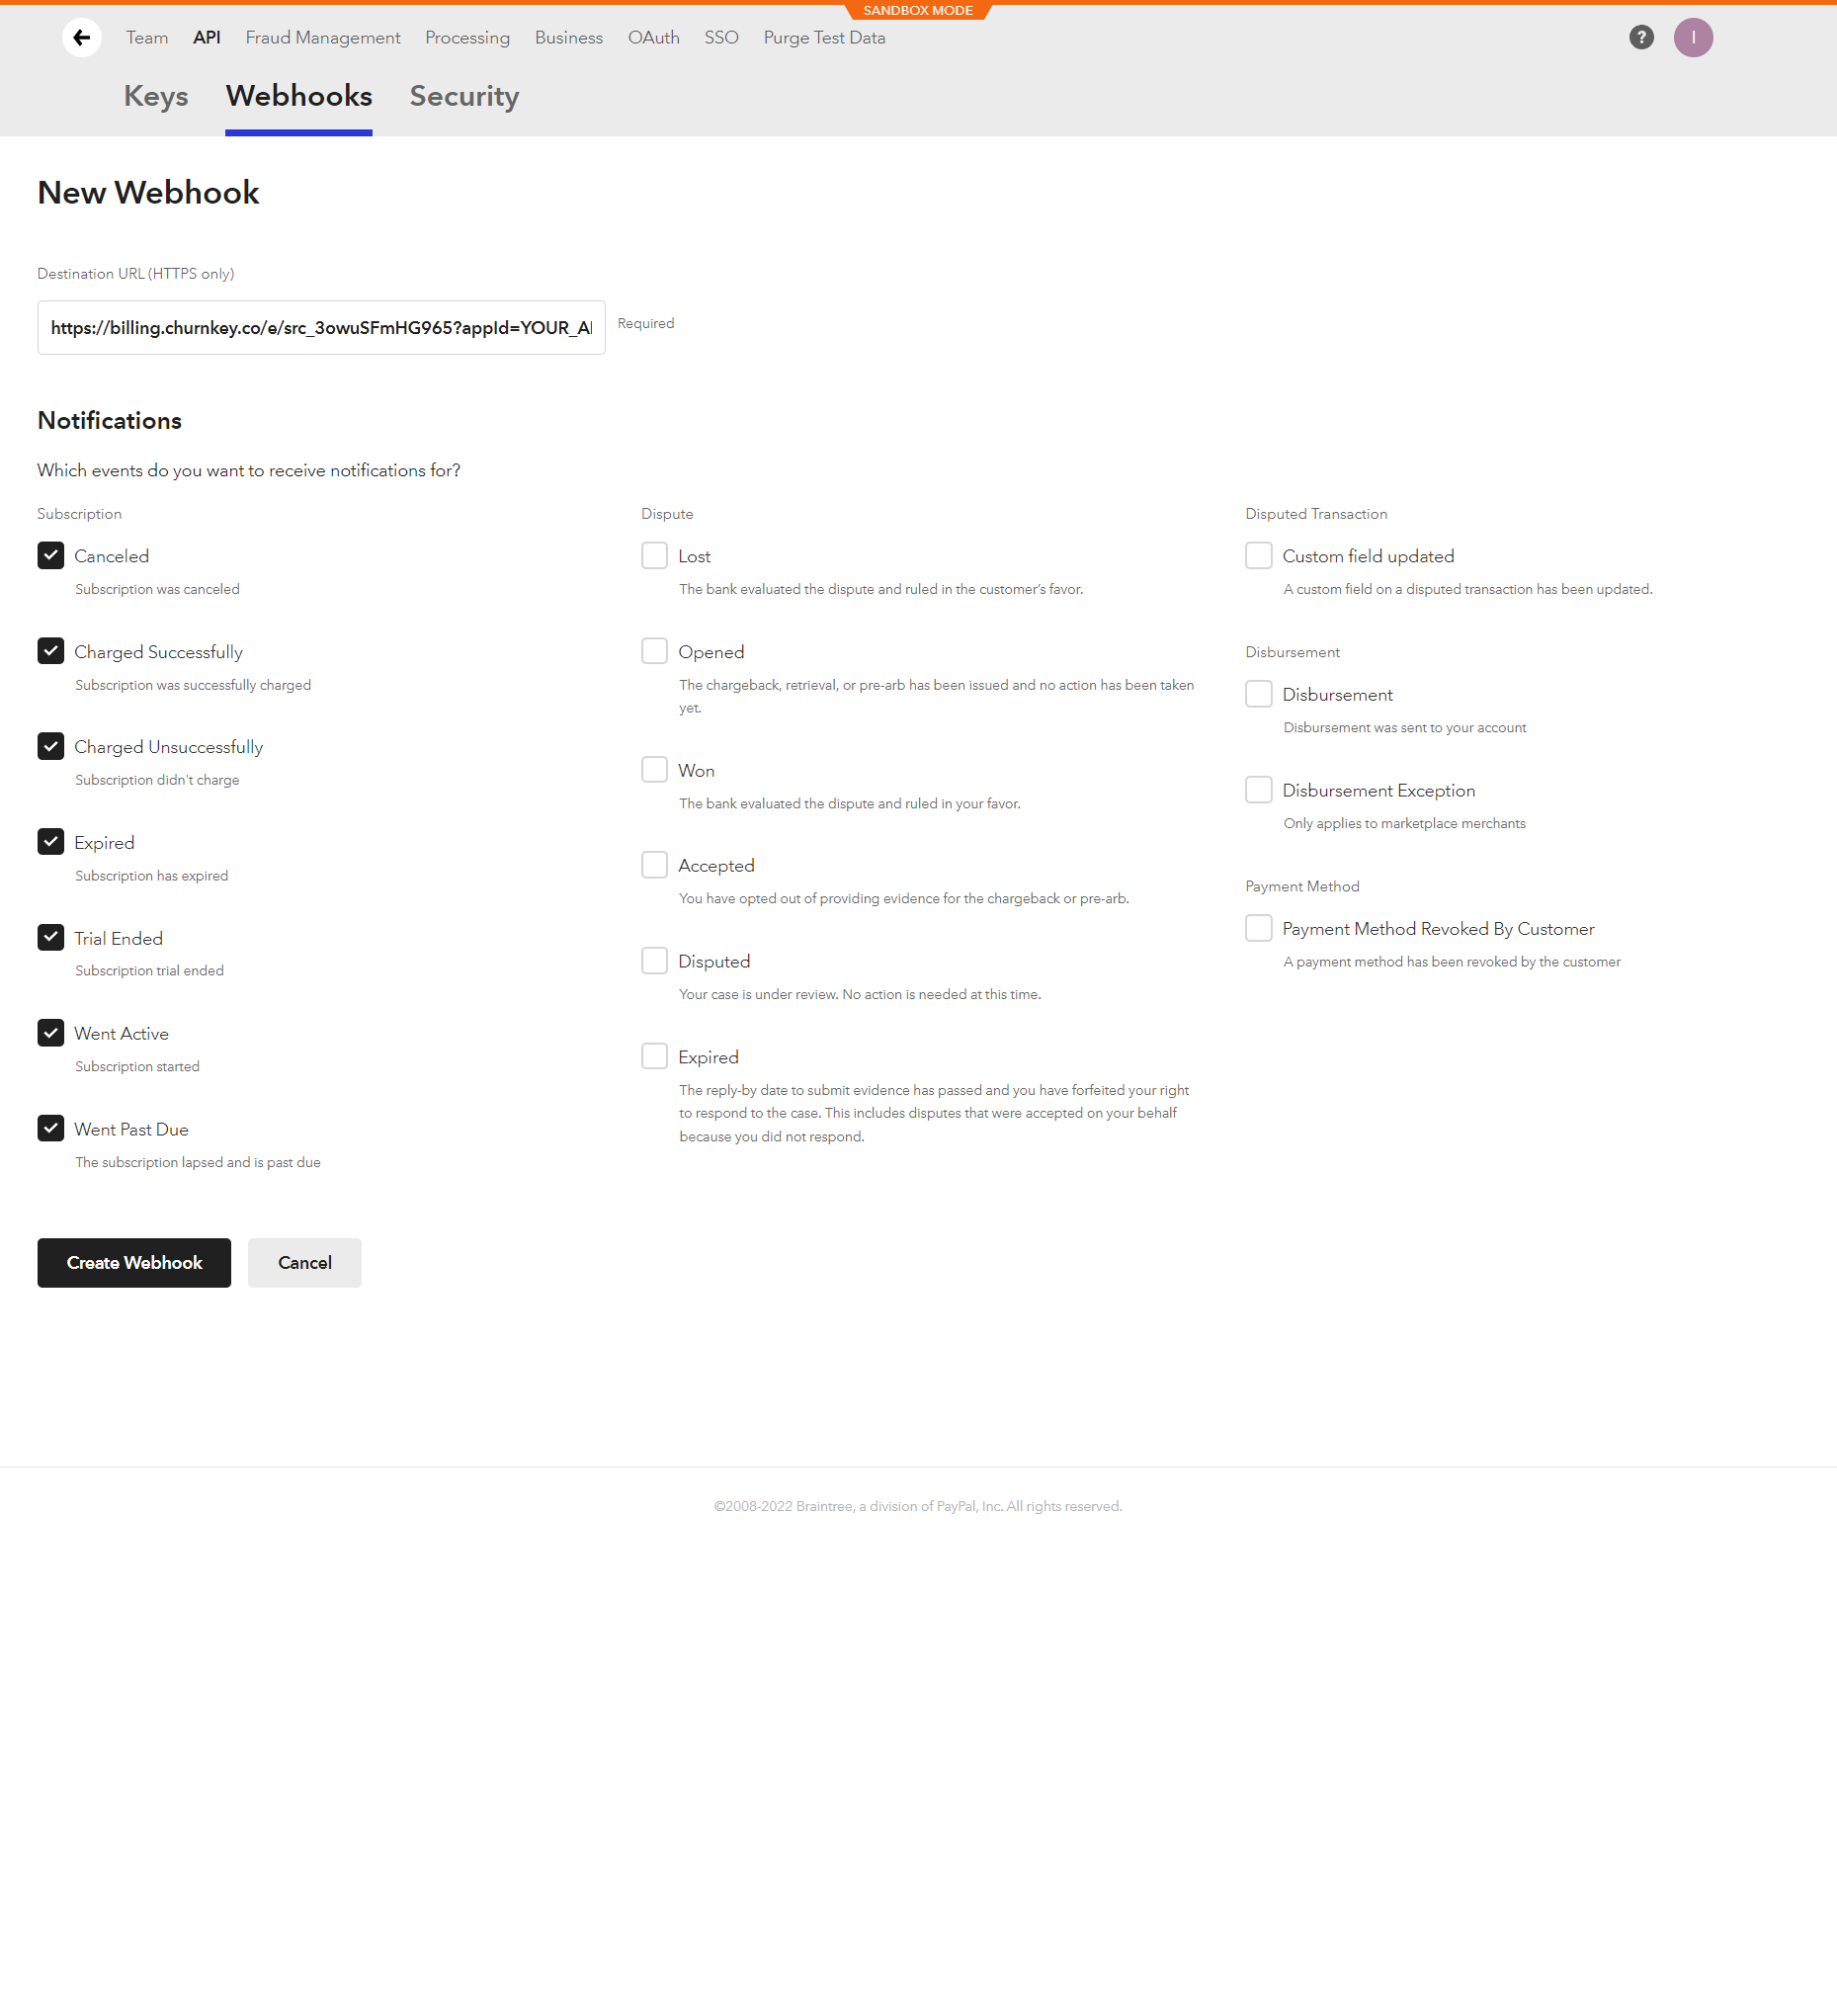
Under the Webhooks tab of the API management settings page in Braintree, add a webhook at URL https://billing.churnkey.co/e/src_3owuSFmHG965?appId=YOUR_CHURNKEY_APP_ID (please note to replace YOUR_CHURNKEY_APP_ID with your App ID - your account specific URL can be found on your Churnkey settings page)
You must enable notifications for all subscription events.
Example Webhook
Step 4. Add API Credentials to Churnkey
The API credentials (merchant ID, public key, private key) can be linked to your Churnkey account on the Billing Provider Settings page:
How is the Braintree connection used?
I. Add discounts to your Cancel Flow
After you connect Braintree (production mode), you'll be able to offer your customers temporary discounts as part of your Cancel Flow. Please note that you will only see your Braintree discounts after you've connected your production Braintree account. We only pull in discount from the production account, not your Braintree sandbox account.
- In the "Offers" tab of the flow builder, choose "Apply Braintree Discount"
- Choose the discount you'd like to offer customers in the dropdown labeled "Braintree Discount"
II. Personalize Cancel Flows with customer attributes and segmentation
Use customer segmentation to reduce voluntary churn with targeted Cancel Flows. With segmentation, you can target specific customers based on subscription attributes and serve up unique Cancel Flows for each of them. After all, someone who signed up yesterday should be spoken to differently from a customer who's been a paying subscriber for years.
🚀 Customer Segmentation Launch Details
Available attributes for segmentation
- Plan
- Price
- Subscription age
- Subscription creation date
- Billing interval (monthly, annual, etc.)
- Trial vs Active subscription
III. Updating customer subscriptions on your behalf
When a customer goes through your Cancel Flow and (hopefully) accepts a pause or discount offer, Churnkey takes care of the billing updates for you.
Churnkey is able to perform the following actions on your behalf
- Pause a subscription
- Apply a discount
- Cancel a subscription
We'll look at each one of these in a little bit more detail.
Pause Subscription
If a customer selects to pause their account through your cancellation flow, Churnkey will match the discount amount to the price of the subscription, in effect creating a temporary 100% discount on the subscription for the selected duration.
If you would like to implement a customer function for applying pauses, you can do so using the handlePause callback (see Custom Callbacks).
Apply a Discount
In the Churnkey offer builder, you can offer specific discounts to customers. These discounts are populated based on the discounts that you have created in your Braintree account.
When a customer accepts a discount, if a subscription ID was provided when initializing the Churnkey embed, the discount will be applied to that subscription. If just a customer ID is provided, that discount is applied directly to every active subscription under that customer's ID.
If you would like to implement a customer function for applying discounts, you can do so using the handleDiscount callback (see Custom Callbacks).
Cancel Subscription
Churnkey can handle canceling your customer's subscription for you. By default, a customer's subscription will be set to cancel at the end of the current period.
Under the hood, Churnkey uses Braintree's built-in subscription cancellation method.
If you would like to implement a customer function for canceling subscriptions, you can do so using the handleCancel callback (see Custom Callbacks).
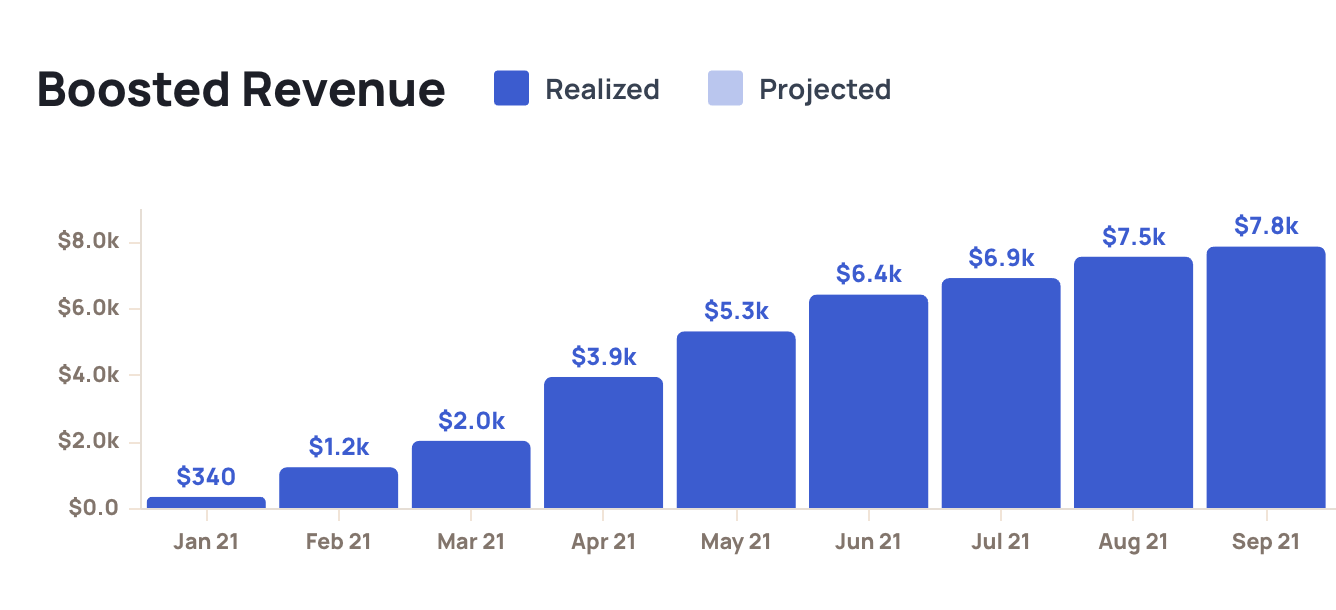
IV. Calculating boosted revenue
Once you've connected your Braintree account, you'll be able to track customer reactivations and boosted revenue - that's all the extra revenue you receive from customers who stayed on instead of canceling.
You can track boosted revenue on your Churnkey dashboard.
Appendix
Required User/Role Permissions
If you decide to create a new role and user for connecting Churnkey to your Braintree account, please ensure it has sufficient permissions, as outlined below.
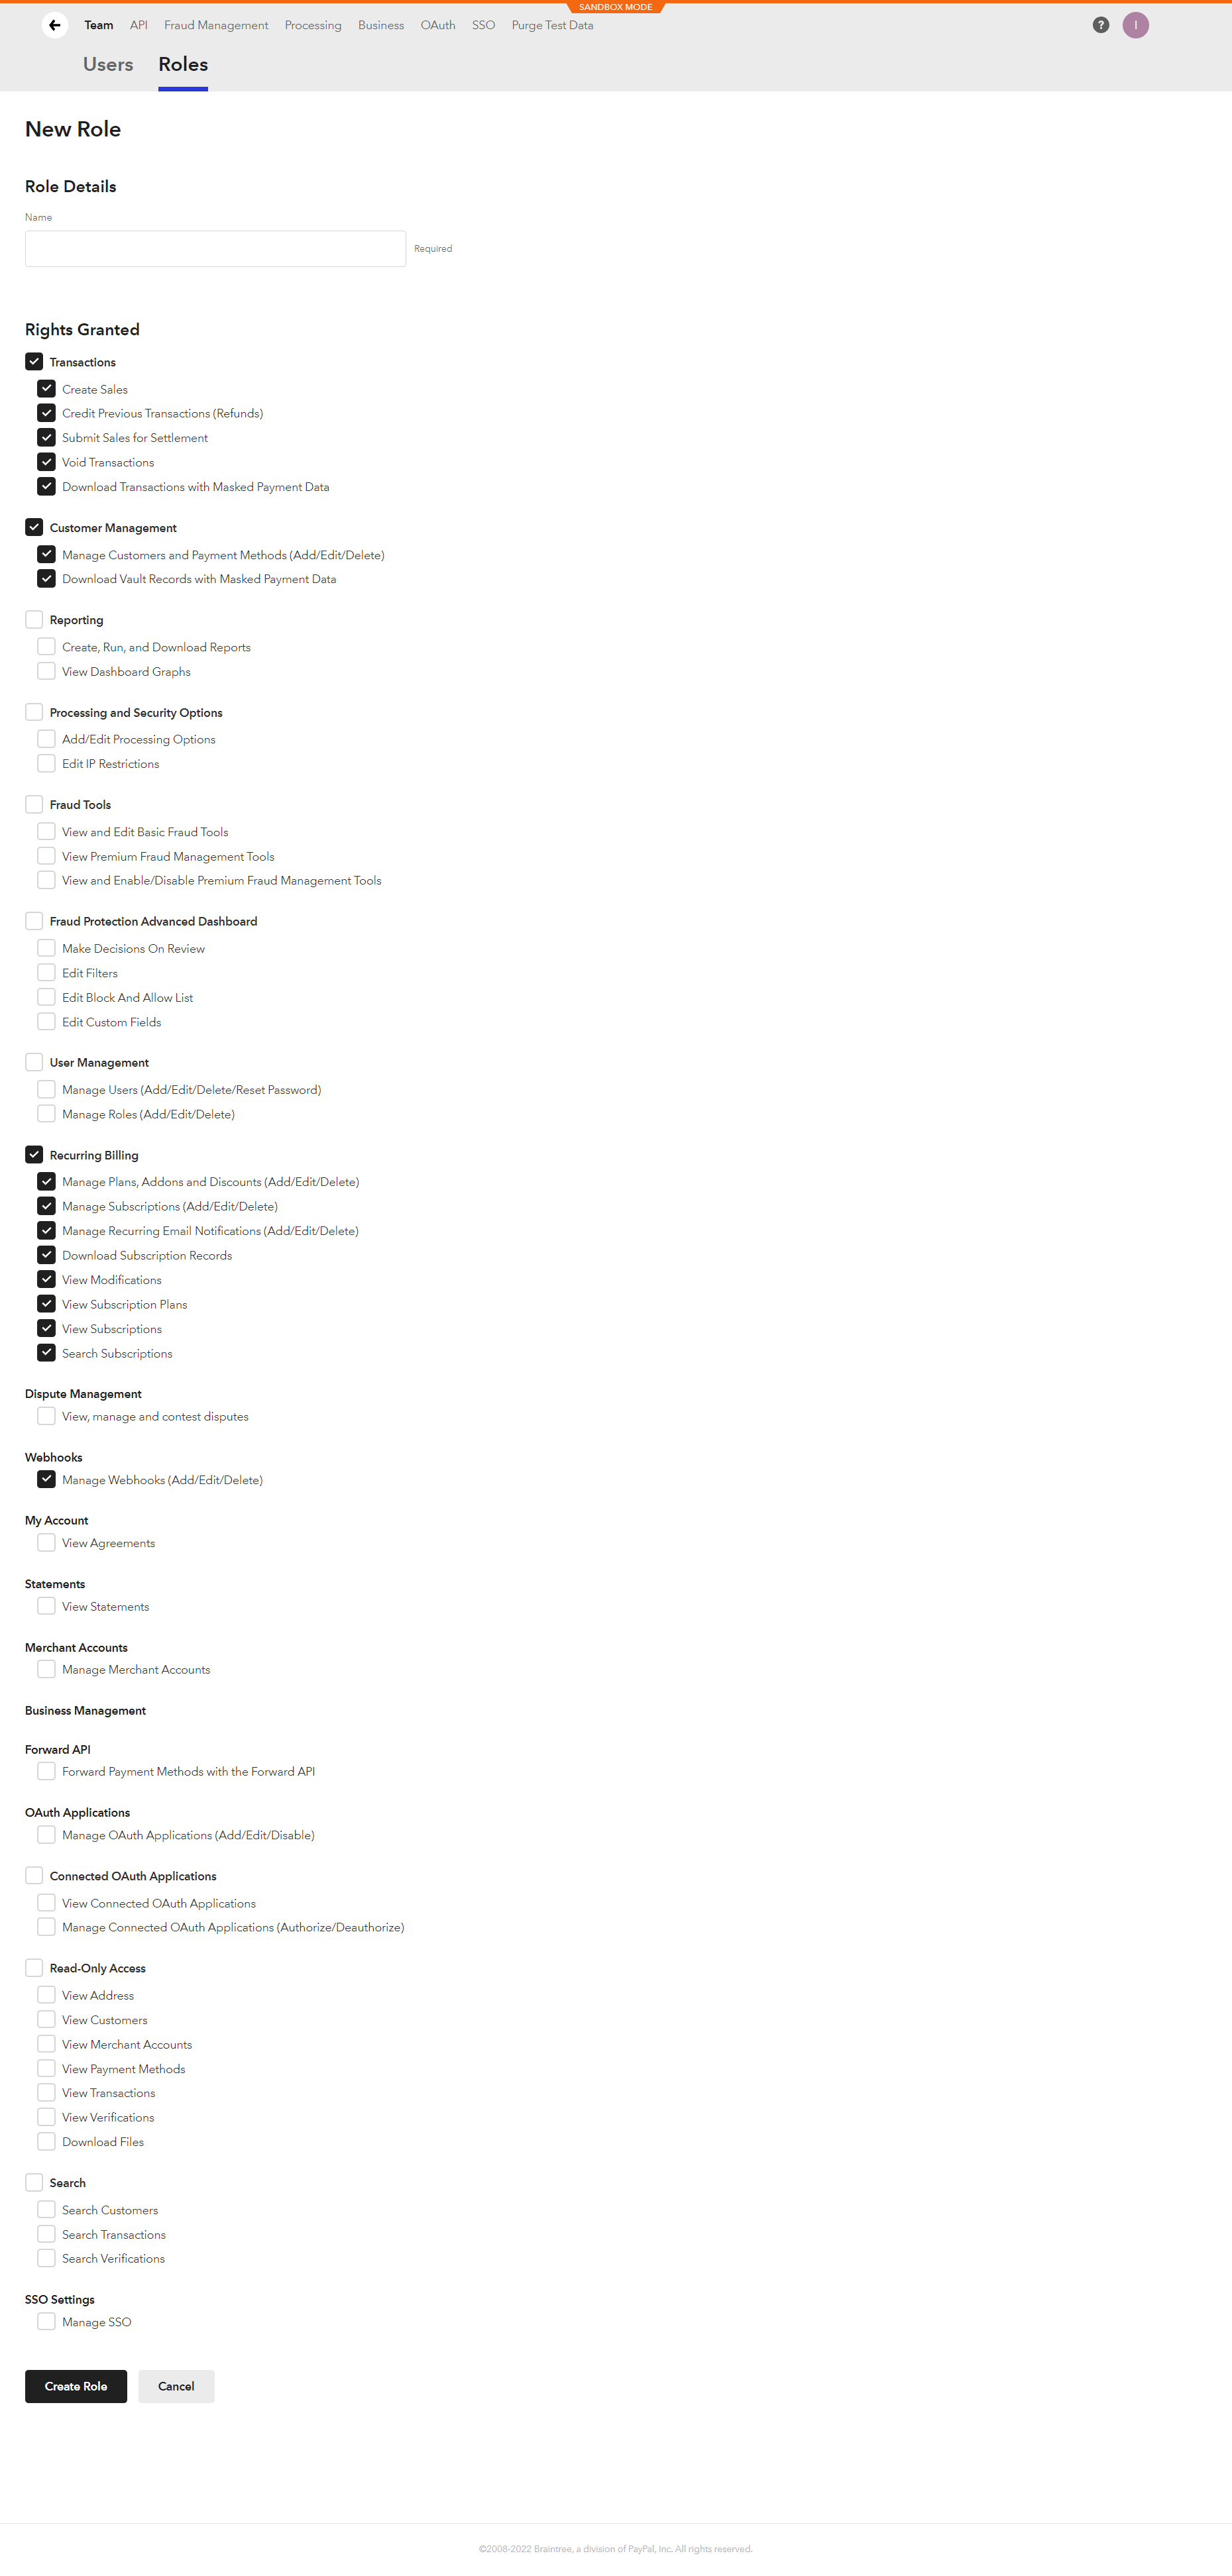
Required Role Permissions
The following Braintree API role credentials are necessary:
- Transactions
- For reactivation analytics (boosted revenue) that you'll see on your Churnkey dashboard; and dunning
- Customer Management
- For dunning
- Recurring Billing
- To take care of subscription billing actions on your behalf (discounts, pauses, cancellations)
- Webhooks
- For reactivation and subscription analytics that you'll see on your Churnkey dashboard
Screenshot of example role with sufficient permissions
Required User Permissions
If you are creating a new user, associate it with the Account Admin role, or with a newly created Churnkey role, as described above.
- ☑️ API Access
- ☑️ Roles
- ☑️ Account Admin; or
- ☑️ Churnkey (as created above)
- ☑️ Merchant Accounts
- ☑️ All