Setup
The Hosted Cancel Flow gives your customers a fully-managed cancellation page that lives on a Churnkey URL — no embed required. You point your "Cancel Subscription" link at it, and Churnkey handles authentication, the cancel experience, and the redirect back to your app. This page walks you through enabling it and dialing in the foundational settings.
Prerequisites
Before you turn on the hosted experience, make sure you have:
- A Churnkey account with a connected billing provider.
- A published Cancel Flow. If you haven't created one yet, follow the Cancel Flow quick start guide first — the underlying flow logic is shared between the embedded and hosted versions, so anything you've already built carries over.
Step One: Confirm Hosted Cancel Flow is enabled
Navigate to Cancel Flow → Hosted in the Churnkey dashboard. The Hosted Cancel Flow toggle is on by default for new accounts, so most teams find the page already live at the fallback domain the first time they open this tab. Confirm the toggle reads "Enabled" before moving on.
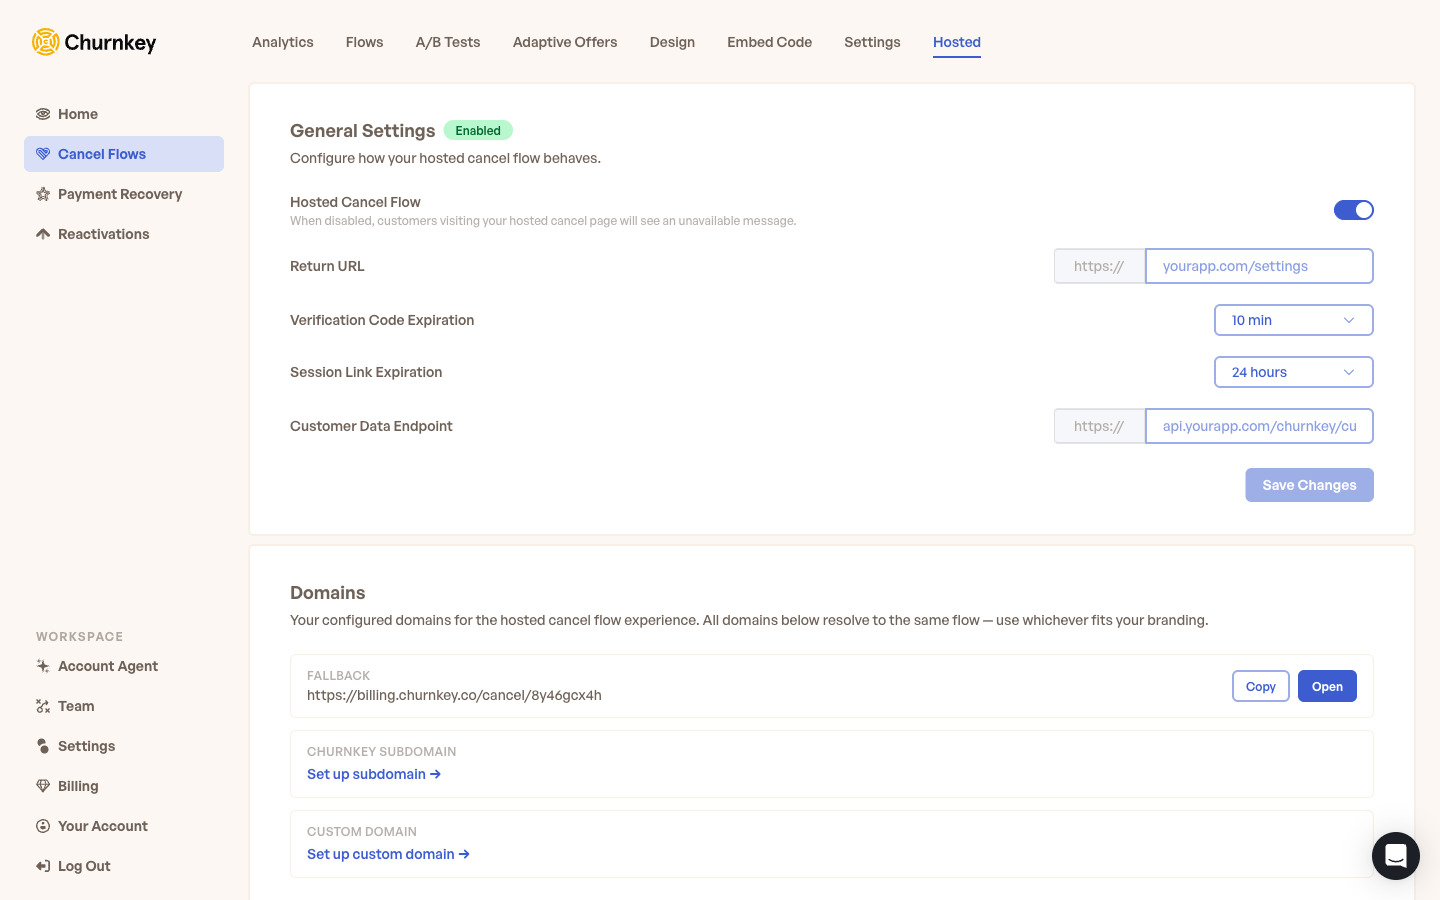
When the toggle is on, your hosted URL is live at the fallback domain:
https://billing.churnkey.co/cancel/<your-app-id>
You can start linking to that URL from your app immediately. If you'd rather host the flow on your own subdomain or a fully custom domain, see Domains — both options layer on top of the same underlying flow.
If the toggle is off (because someone on your team disabled it), flipping it back on takes effect the next time a customer loads the URL — they will see an "unavailable" message until then.
Step Two: Set the Return URL
The Return URL is where Churnkey sends the customer once they finish (or skip) the cancel flow. Two patterns work well here:
- Send them back to their account or billing page (for example
https://yourapp.com/account) so they land somewhere familiar. - Send them to a "we're sorry to see you go" page that confirms the cancellation in your own voice.
Always serve the Return URL over https:// — the entire cancel-flow journey runs over HTTPS, and sending customers back to a plain-http:// page produces mixed-content warnings in the browser. After a cancellation completes, Churnkey shows a confirmation screen with a 10-second countdown before redirecting automatically. Customers who want to leave faster can click through immediately.
The Return URL applies to both Cancel Links and the self-serve email verification flow, so you only configure it once.
Step Three: Configure expirations
Two separate timers control how long links and codes stay valid. Both exist for security reasons, and both are worth thinking about.
Verification code expiration controls how long the code Churnkey emails a customer remains valid when they go through self-serve email verification. The default is 10 minutes, and you can set it anywhere between 5 and 30 minutes. Shorter windows are more secure — a code that's only good for a few minutes is harder to intercept and reuse. Longer windows are more forgiving when customers get distracted mid-flow, switch tabs, or check email on a different device.
Session link expiration controls how long a Cancel Link stays valid. A Cancel Link is the signed URL your backend generates through the Churnkey API and hands to a logged-in customer — it bypasses the email verification step because your own server has already authenticated the user. The default is 24 hours, and you can set it anywhere between 1 hour and 7 days.
The security tradeoff with session links is straightforward: the longer a link stays valid, the larger the window in which a leaked link could be abused by someone who shouldn't have access to that subscription. If your customers click cancel links within minutes of you generating them, a short expiration is safer. If you embed the link in an email or a help article and expect customers to click later, give yourself more breathing room.
Both expirations are independent. You can set a tight verification code window for self-serve traffic and a generous session link window for backend-generated links, or vice versa.
Step Four: Test the flow
Once the basics are configured, open your hosted URL in a browser and walk through the experience exactly as a customer would. Confirm that the offers, questions, and final cancellation step behave the way you expect, and that the Return URL lands the customer where you intended. The Appearance tab (see Appearance) also shows a live preview alongside its color and font controls — handy if you want to see your branding changes without leaving the dashboard.
Run the page in test or sandbox mode
By default the hosted page runs in live mode and serves real customers. To rehearse the full experience without touching real billing data, append a mode query parameter to your hosted URL:
?mode=testruns the flow against your billing provider's test environment (for example, Stripe test mode).?mode=sandboxruns the flow against a connected Stripe Sandbox — a separate environment from legacy test mode, with its own connected account.
https://billing.churnkey.co/cancel/<your-app-id>?mode=test
https://billing.churnkey.co/cancel/<your-app-id>?mode=sandbox
In either mode the flow runs against the matching non-live credentials, so you can walk a test subscription all the way through cancellation without affecting real customer records. The value is case-insensitive; any other value — or no mode parameter at all — runs in live mode. When you're satisfied, drop the parameter and the same flow starts serving real customers.
The environment you select must be connected to Churnkey, and the customer must exist in it. ?mode=sandbox requires a Stripe Sandbox connected to your account, and ?mode=test requires test-mode billing credentials — otherwise the flow can't look the customer up. This works with the self-serve email verification path out of the box; pre-generated Cancel Links are tied to the mode they were created in, so test them in their matching environment.
The Hosted Cancel Flow uses your existing Cancel Flow configuration. Any change you publish to offers, questions, or branding applies to both the embedded and hosted experiences.
What's next
With the hosted flow enabled, the next steps are mostly about making it feel like part of your product:
- Domains — point a custom domain or a Churnkey subdomain at your hosted flow.
- Appearance — customize colors, logos, and copy so the page matches your brand.
- Cancel Links — generate signed URLs from your backend for logged-in customers.
- Email verification — let customers self-serve by verifying ownership over email.